How to Forward Emails in Microsoft365 (Office365) to External Domains
This guide provides a walkthrough on how to set up automatic email forwarding in Microsoft365. While we’ve tailored this tutorial specifically for Deskhero integration, the same steps can be applied to many other platforms. To keep things cost-effective, we’ll use a “shared mailbox” in Microsoft365, avoiding any additional licensing costs for the mailbox.
Step 1: Create a Shared Mailbox
- Log in to your Microsoft365 environment using admin credentials.
- Select “Admin” from the left menu.
- Click “Show all”, then “Exchange”. (This directs you to the “Exchange admin center”)
- Under the “Recipients” menu option, choose “Mailboxes”.
- Select “Add shared mailbox”.
- Provide a name and, importantly, an email address (e.g., support@yourcompany.com).
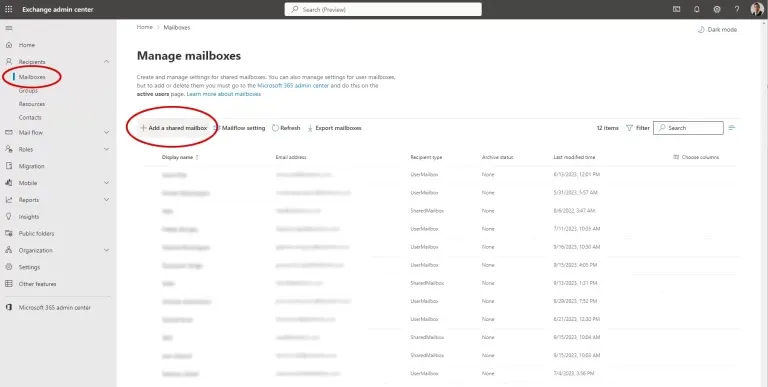
Add shared mailbox
Step 2: Set Up the Forwarding Rule
After setting up your shared mailbox (the process is identical for a standard user mailbox, should you choose that route):
- Click on the Display name in the mailbox list.
- In the panel that appears, select “Email forwarding” from the top menu.
- Activate the “Forward all emails sent to this mailbox” option.
- Choose “Forward to an external email address”.
- Input the destination email address. (For Deskhero, it’d be something like groupname@yourtenant.deskhero.com.)
- Optionally, if you wish to keep copies of the forwarded emails, tick the “Deliver message to both forwarding address and mailbox” box.
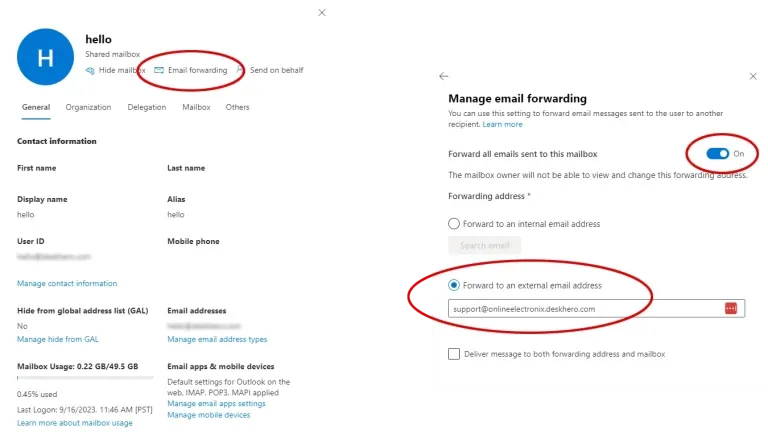
Forward to an external email address
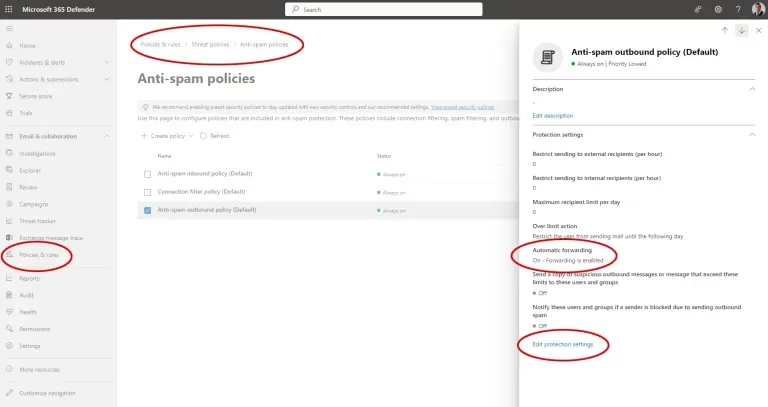
Step 3: Permit Forwarding to External Domains
Some users find that emails aren’t forwarded as intended, encountering error messages like “550 5.7.520 Access denied, Your organization does not allow external forwarding. Please contact your administrator for further assistance. AS(7555)”
To address this, you’ll have to adjust a setting allowing emails to be forwarded automatically to third-party domains.
Finding the setting can be a tad tricky:
- Again, log into your Microsoft365 environment as an admin.
- Select “Admin” in the left menu.
- Click “Show all”, then choose “Security”. (This leads to the “Microsoft 365 Defender” portal.)
- Under “Email & Collaboration”, select “Policies & Rules”.
- Proceed to “Threat policies” and then “Anti-Spam” Policies.
- Click on the “Anti-spam outbound policy (Default)”.
- Choose “Edit protection settings”.
- Set the “Automatic forwarding rules” to “On – Forwarding is enabled”.
- Make sure to save your changes!
Enable ‘Automatic forwarding’